Installing a new SSD should be a relatively straightforward process, but you may encounter some issues. Perhaps the biggest culprit is that your SSD decides not to show up to work that day. It’s one thing if the drive in question stores pictures and music, and quite another if you integrate that SSD as a boot drive for Windows 10 or 11.
Luckily, you’re not the only person whose new SSD isn’t recognized by their PC. This is actually a pretty common problem, which is what originally inspired us to put together this guide. Over time, we’ll cover various troubleshooting and repair methods and answer some frequently asked questions.
Bill Roberson / Digital Trends
Check if it is installed properly
I know you know what you’re doing, but just do this for me, okay? We’ve all forgotten to connect a SATA cable or mounted an NVMe SSD not quite right. There is no shame in that.
Step 1: If you are installing a SATA SSD, check that the SATA cable is properly connected to the drive and your motherboard and that the drive has a SATA power connector that goes to your power supply. If in doubt, unplug the connectors and plug them back in.
If you are installing an NVMe SSD, make sure the slot you are installing it in supports that size and drive type. Older PCI Express generations should support newer ones, but at slower speeds.
Step 2: If you suspect this is the problem, you can also try installing a drive in a different slot on the motherboard and using a different cable for SATA drives.

Jon Martindale / Digital Trends
Check your BIOS settings
Your PC may not be set up to detect new SSDs. Checking the UEFI/BIOS can be a good way to ensure this.
Step 1: Restart or boot your PC and use your motherboard’s special key to open the UEFI/BIOS. For many it will be like this F2 or Of, but it can be any set of buttons. If you are unsure, check your manual or the manufacturer’s website.
Step 2: Look for a section about storage or configuration. It will vary significantly from BIOS to BIOS. Again, check your manual or the manufacturer’s website for help navigating your system’s BIOS.
Step 3: If you are using an older SATA SSD, make sure the SATA configuration is set to AHCI. Alternatively, if you are having trouble with this mode not recognizing your SSD, you can try setting it to IDE or compatibility mode to see if that solves the problem.
Step 4: Some older motherboards may require certain SATA ports to be enabled in the BIOS. Look for signs that this might be the case for you and, if necessary, enable the appropriate SSD ports.
Digital trends
Initialize the drive
Sometimes Windows doesn’t recognize a new drive until you initialize it.
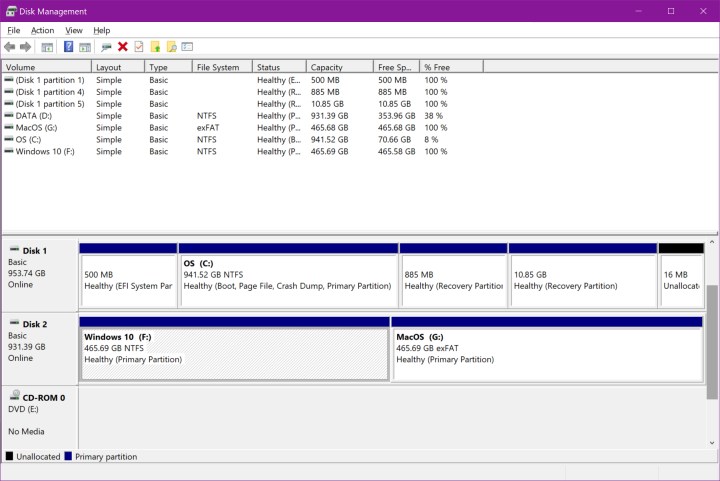
Step 1: Choose Windows key + Xand choose Disk management from the list,
Step 2: Find your new drive. You can search for the drive letter if you know what it should be, but looking at the capacities can also be helpful.
However, if your new drive is not initialized, it will actually have a black bar at the top of Unallocated space and a small red circle icon next to the drive name.
Step 3: Right-click the drive and select it Initialize hard drive.
Step 4: Choose your preferred partition style: MBR or GPT. You almost certainly want GPT, but choose the one that suits your needs and then choose OK.
Step 5: Wait for the drive to complete initialization, then right-click the Unallocated space and select New simple volume, and follow the on-screen instructions to create it.
Step 6: Your drive should now have enough space to install applications and store files and other data.

Jon Martindale / Digital Trends
Change the drive letter
It’s possible that a drive conflict has caused your new SSD to not be recognized because it doesn’t have its own drive letter. We can change that with a simple solution.
Step 1: Press Windows key + Xand choose Disk management from the list.
Step 2: Right-click and select the SSD whose drive letter you want to change Change drive letters and paths.
Step 3: If your drive has a letter, select that Change. If there isn’t one, select it Add.
Step 4: Select a new drive letter from the drop-down menu. If your drive already has a letter, you may want to remove that too. However, keep in mind that this may cause problems with existing apps or games on the drive.
Step 5: When you’re finished adding, changing, or removing letters, select OK finish. Then restart your PC and check if the drive is recognized.

Digital trends
Format the drive
It may be that the drive setup is causing it to not be recognized. Starting from scratch may be the best way forward.
Step 1: Choose Windows key + Xand choose Disk management from the list.
Step 2: Right-click the drive you are having problems with and select iFormat.
Step 3: Select the file system you want to use (for most people it’s NTFS) and then choose the default allocation size unless you have a very good reason not to.
Step 4: Check the box for a Quick format and press OK begin.
Step 5: Wait for the formatting to complete, then restart the PC and check if the drive is recognized.
Why does my SSD show up in BIOS but not in Windows?
If your SSD is visible in the BIOS but you cannot find the drive in Windows, there could be several reasons. First, you should make sure the drive is configured correctly. This also includes ensuring that controller modes such as RAID and AHCI are set correctly.
If your configuration looks good, launch the Windows Disk Management tool to prepare your second drive for onboarding. There’s a chance you’ll need to use this tool to create a completely new space on the drive. You may also want to ensure that your SATA card is correctly placed in the appropriate motherboard slot.
How do I know if my SSD is failing?
You may be wondering if the fact that Windows isn’t recognizing your SSD might have more to do with the drive itself. If you suspect that your SSD might be defective, sluggish performance is one of the most common signs of device failure. If you noticed that your read and write speeds weren’t very good, your SSD may be showing a warning signal.
Launching apps and software and booting up your PC may also be affected. If these simple processes start to slow down, it could be another cause for concern.
Who makes the best SSDs?
We have a comprehensive guide on the subject, but in general, companies like Samsung, PNY, Western Digital, and Crucial are some of the safest and most reliable brands.
If after all the above steps the drive is still not recognized in Windows, there may be a hardware problem. Try another drive and see if that works. If this is the case, you may need to replace the original. Here is our list of the best SSDs in 2024.
Editorial recommendations